

TTCallie
-
Posts
1 -
Joined
-
Last visited
TTCallie's Achievements
1
Reputation
-
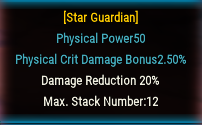
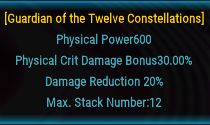
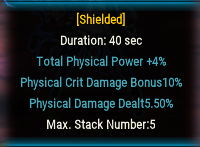
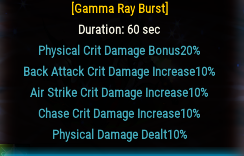
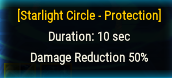
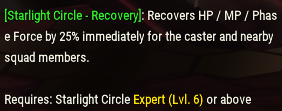
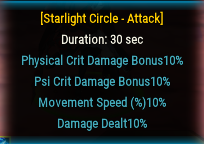
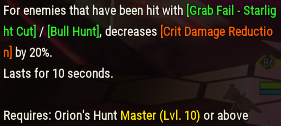
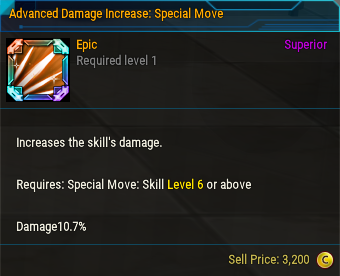
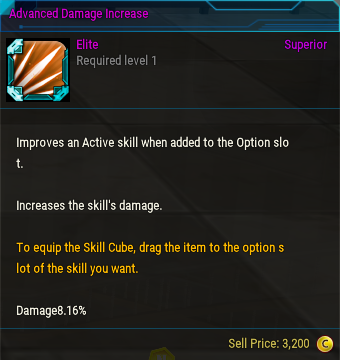
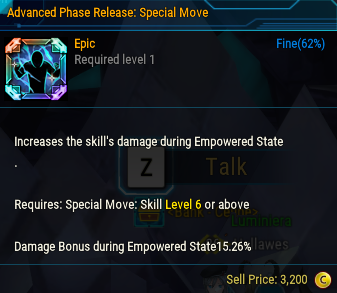
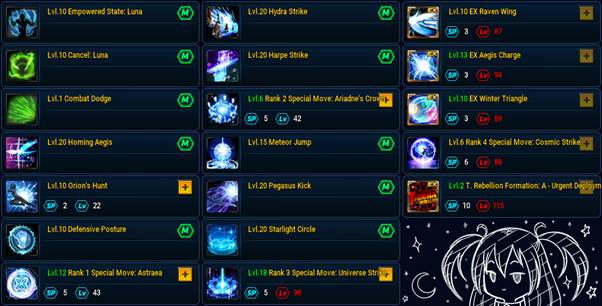
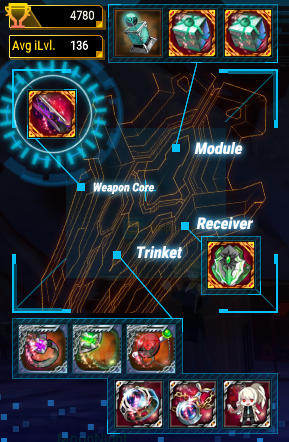
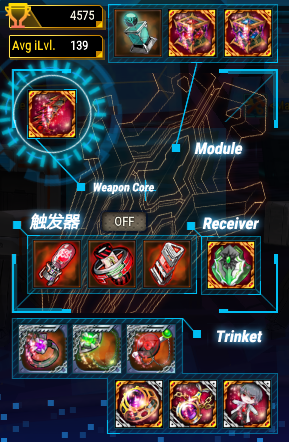
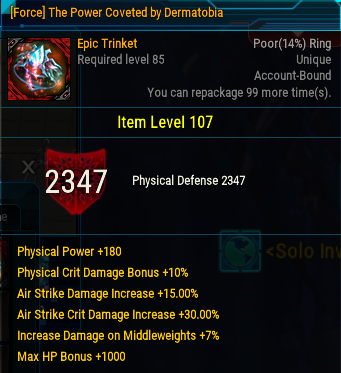
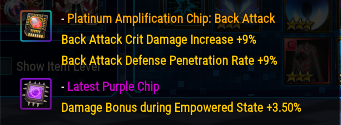
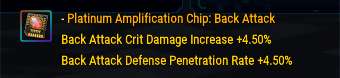
NOTE: THIS IS A RE-UPLOAD OF ESTHER'S LUNA GUIDE ALL CREDIT GOES TO ESTHER AND HIS BEAUTIFUL GUIDE, I JUST MANAGED TO FIND IT AND BROUGHT IT BACK ======================================================================================= [IMPORTANT: This guide's version is final and will no longer be updated due to me leaving the game.] Hello! My IGN is Hellawes, and I've decided to make an in-depth Luna guide because she needs more love on the forums, and seeing Luna's Guide Section dead and empty hurts my soul. This is my first guide, like, ever, and I've never been determined enough to create things like that, but my love towards this adorable child (no homo) is stronger than my anxiety. Please do help the guide improve by leaving feedback/criticism/info I might've missed/messed. I'll include it in the guide and mention you. You'll be famous ;^) This guide is PvE only, you won't find any PvP-related info here. Side note: some skill effect names (especially skill cube ones) may differ from in-game ones due to me not having access to those skill cubes/descriptions anymore because ✨endgame✨. With that being said, let's begin. Table of Contents: 1. Introduction; 1-1. Pros; 1-2. Cons; 2. Skills; 2-1. Trainee; 2-2. Novice Agent; 2-3. Regular Agent; 2-4. Special Agent; 2-5. Awakened Skills; 2-6. Task Force; 2-7. Skill Overview; 2-8. Option Skill Cubes; 2-9. Rotations; 3. Skill Build; 4. Passives; 4-1. Task Force Passives; 5. Endgame Gear Setup; 5-1. Purification Ops and Wolfgang (pre-endgame); 5-2. Beelzebub and Hoffman (current endgame); 6. PNA, Chips and Tunes; 6-1. PNA; 6-2. Chips; 6-4. Tunes; 7. Credits&Thanks; 8. Changelog&To-do list. 1. Introduction Luna is a Physical Damage-type character with great damage and insane sustain. Her kit allows her to survive in many dangerous situations without much efforts, she is the walking i-frame with a bunch of heals, and her counter mechanic will make you forget potions exist. Though, Luna is not the type of character who one-shots everything as soon as the battle begins. She gets stronger over time by stacking strong buffs to build-up her DPS, so the longer you fight - the stronger you become. All of her attacks have built-in Air Strike proc, which means you don't have to bother staying in the air at all ez life, right? Remember one thing: if Luna dies, she does it for fun. 1-1. Pros Nice damage; Excellent sustain; No jumps; thank god Easy Phase Force stacking; Easy to learn; Comfortable for soloing; Cute. 1-2. Cons Slow compared to other characters; (benefits slowpokes like myself) Mana hungry. Very. Hard to stay airborne for long time when needed; The amount of dashes will make you suffer in limited spaces; Lewd costumes. 2. Skills 2-1. Trainee Phase Shield While on the ground, all skills count as [Air Strike] Each successful [Counter] adds [Shielded] stack, and a [Counter]'s attack applied as [Super Armor Crash Level 5]. [Shielded] lasts for 40 seconds and stacks up to 5 times. *Obtains max stacks during Empowered State. 5 Stacks Stats: Empowered State: Luna Standard ability for every character, Luna's Phase Force Burst grants her all 5 stacks of [Shielded] upon activation, which still last for 40 seconds. Leveling this ability increases Empowered State duration and Damage Bonus during Empowered State. Cancel: Luna Another standard ability for each Closer, this is your "Force Cancel" a.k.a "Combo Break". Leveling this ability provides longer i-frame and lowers its cooldown. Combat Dodge This skill allows you to dodge incoming damage if timed properly and/or decreases the damage taken by 60% for the entire animation. To get the "Perfect Dodge", you have to press it just before the damage is about to be done, at the very beginning of skill's animation. If you succeed, Luna will neglect damage taken and receive an i-frame after. 🌟 Some Bosses' attacks/mechanics ignore any other i-frames and can only be dodged by this skill's "Perfect Dodge", Hell's waves 7/8/10 AoE oneshots are being good examples. Raven Wing Does 3 hits while dashing forward (you can choose the direction with arrow keys). You have to press skill button again in order to do additional hits, and the range of the last attack is increased. A great repositioning and movement ability. Decent damage as well. ◼️ Skill Cubes: Homing Aegis You're gonna love this skill. Throws Shield ahead, which tracks and attacks up to 7 enemies. Gets 1 charge whenever the skill refreshes, and can be used up to 2 (3 with the Skill Cube) times in a row. Nice damage, excellent range and low cooldown allow you to spam this gift of the gods and disrespect mobs from a disgustingly safe distance. ◼️ Skill Cubes: Orion's Hunt A nice tool for gathering mobs or dealing damage, this skill comes in two versions: grab + kick, or a dash attack (if target can't be grabbed). While the grab&kick attack does not deal very impressive damage, dash attack can be triggered manually, deals twice more the original damage with a Skill Cube applied, and can also be spammed for Crit Damage Reduction debuff. ✨Utility✨. 🌟You can use this skill as a quick mobility double-dash if you hold the down arrow key and movement arrow key. Just saying. ◼️ Skill Cubes: Defensive Posture This is a masterpiece. This is what makes Luna a Luna. This is what will help you deal with that nasty mana issue if you use it as intended. This is your bread and butter and the reason you can stay in combat and smash back while others have to dodge or waste their precious i-frames. Abuse it and make them jealous Luna lifts the Shield to block an enemy's attack. If she gets damaged during skill cast, it will activate [Counter]; [Counter]'s damage increases with each Special Move learned; [Counter] is an i-frame for the entire cast duration; If [Counter] is activated successfully, it will restore 15% Phase Force and 25% HP and MP. 🌟Even if you don't trigger [Counter], you will still get 15% Phase Force, but will not restore any HP and MP. This allows Luna to stack her PF efficiently just by using the skill itself, even without constant timing of actual [Counter] procs, which is also crucial for your rotation. ⬇️ 🌟Using [Defensive Posture] (even without triggering [Counter]) also augments some of Luna's skills: Homing Aegis, Harpe Strike, Pegasus Kick and EX/Non-EX Aegis Charge. All skills remain augmented until you use them, the only exception being EX/Non-EX Aegis Charge (More info in respective skills' Skill Cubes). 🌟Luna is invincible not only during the skill animation, but also during a successful [Counter] animation, which makes the i-frame duration long enough for you to pat your cat. 🌟Some certain Boss' attacks, however, do NOT trigger [Counter], but Luna is still invincible while hiding under her shield. (Example: David's AoE DoT with 2 green circles, Tiamat's arrow keys move, Tindalos' "Whoever dares to confront it shall be burnt" attack - a flash of fire). 🌟Besides augmenting [Homing Aegis], also restores 1 charge of it so you can deploy it instantly even if all charges are on cooldown. Special Move: Astraea (FM1) A fidget spinner ultimate which comes in two versions: it either helps you to gather mobs in a middle distance from cast spot, or deals a full-damage one-hit strike and flies straight to infinity and beyond (with the power of Skill Cube, of course). ◼️ Skill Cubes: 2-2. Novice Agent Aegis Charge A bit wonky skill to use due to the movement patterns it uses, however it can be avoided by, wow, holding down the down arrow key. IIRC, initially this skill has 3 charges, which turn into 5 when the Skill Cube is applied. Also an i-frame (which i never bothered to get used to, tbh) ◼️ Skill Cubes: Hydra Strike A tasty skill in terms of damage, which gets its cooldown reset by successful [Counter], and becomes even tastier because of that (Skill Cube required). 🌟Use this skill as close as possible, since every rift has its own hitbox, thus dealing greater damage when used face-to-face (Master Skill Cube). ◼️Skill Cubes: Harpe Strike Yet another tasty source of damage, as well as an i-frame, normal version of this skill does a triangle-trajectory dash (2 dashes with Skill Cube), while augmented one makes it a single full-damage dash without losing its i-frame (though it obviously has way lower duration). ◼️ Skill Cubes: Special Move: Ariadne's Crown (FM2) Second ultimate we get. Nice damage, i-frame for the entire cast duration, great range if used normally, can be used on current location if pressing the down arrow key. 🌟You can cancel its cast altogether and still gain the buff by using it in air and cancelling it before you actually land on the ground. - the more you know, credits to Vessaliux ◼️ Skill Cubes: Meteor Jump (Skill Ticket) Guess what? Another i-frame, hold the skill button to extend its duration, the whole landing animation counts as an i-frame. Nice damage as well. 🌟Due to Luna being high above during this skill, Its i-frame can be used to avoid some of the Bosses' attacks which hit through regular i-frames (Example: Adv Gremory walls, Rep/Hell/OF - Tindalos' Blue&Red portals explosion if timed properly; OF Wave 5 Vortex - only use it in the end since the skill is auto-landing. This saved my capsule couple of times.) 🌟Separating this one because important. You can jump over all kinds of walls in BB raid as well with this skill. This works for ALL Syrphid's walls, Dermatobia's walls when you have to run towards the fingers, and also for King Beelzebub's 2nd shadow which also gives you your favorite walls. Needless to say you can save yourself in Vessels with it on phase 1, though camera goes autistic so you have to remember the location you fell from and move back there without any visual clues. Camera angle will change when you reach the platform, indicating you're safe to land. ◼️Skill Cubes: 2-3. Regular Agent Pegasus Kick This is your second [Defensive] stance, which can trigger a [Counter] (Skill Cube needed). Normal version is a slow "dash", which can be used on current location (guess how). Augmented version is a swift diagonal jump. Both have 80% Damage Reduction for the entire cast duration. 🌟Pegasus Kick's [Defensive] stance does NOT trigger [Defensive Posture]'s augmented stacks and [Shielded] stack upon successful counter, neither it restores Luna's Phase Force. However, it DOES restore 25% HP and MP, DOES provide i-frame similar to [Defensive Posture], including i-frame during successful counter animation, DOES reset Hydra Strike cooldown, and DOES give you a stack of [Star Guardian] (SA Passive). 🌟To trigger the second [Pegasus Comet Kick] instead of [Defensive] stance, use the [Defensive Posture] before casting the skill for the 2nd time. It will provide you with another [Pegasus Comet Kick] stack thus allowing you to jump again. 🌟You can cast this skill on place if you manage to time it properly: press the opposite direction arrow after Luna jumps up and right before she's about to drop down, this should change the direction of the skill thus resulting in Luna's landing right where you began casting the skill (@cruzerblade1029 ty for pointing this one out <3) ◼️ Skill Cubes: Starlight Circle One word: Sexy✨. This is your pocket version of Tein's FM3, but with fixed 20 seconds cooldown instead. It attacc, it protecc, it heals, it gives Phase Force. It does the same to your adorable fragile squadmates, who will give you some extra pats if you cast it for them. You can either jump on a nearest ally within 20-meters radius if cast normally, or selfishly place it on yourself by holding the Down arrow key. If you're still thinking your Luna is not a walking i-frame, just wait. There's more. 🌟Luna gets i-frame straight from the start of the skill animation. Her allies, however, only get it when the skill is deployed. Keep that in mind when timing this save for yourself and/or for your team. ◼️ Skill Cubes: Winter Triangle A neat buff for you and your squad, while also a nightmare for all the poor mobs around you. Suddenly not an i-frame. Creates 3 floating stars around Luna, each providing a certain buff for you and your buddies, as well as some debuffs for those fools who dare to spawn nearby. And no, this is not an i-frame. Seriously. Wow. You can maintain 100% uptime for this skill. Please do. ◼️ Skill Cubes: Special Move: Universe Strike (FM3) Your One-Hit-Burst ultimate which hurts A LOT. Love it. Spam it. Oh, did i mention it's an i-frame? For the entire cast duration, of course. 🌟You can cancel its animation by casting any other skill and keep the DPS while it charges, however, keep in mind that you will lose its i-frame as well. 🌟Make sure to wait for about 0,5sec before cancelling it, otherwise the damage will NOT apply. You will just waste the nuke. ◼️ Skill Cubes: 2-4. Special Agent Star Guardian it begins Luna can better utilize Aegis’ power. [Counter] attack's damage % from [Defensive Posture] and [Pegasus Kick] will be amplified by 2x and 1.5x respectively, and Luna will gain [Star Guardian] stack. [Star Guardian] can be stacked up to 12, and will increase Luna’s Physical Power & Physical Crit Damage Bonus. Upon gaining 1st stack, Luna will also receive 20% Damage Reduction effect. (Damage Reduction can NOT be stacked further) - These stacks are permanent btw. Even if you die (for fun, obviously). Stacks ain't going anywhere. :^))) *Listed effects will only apply when FM3: Universe is learned, and will not activate in UNION Arena. 12 Stacks Stats: The time has come for our skills to evolve on a new levels beyond broken. EX Raven Wing Changes the skill into 2 consecutive hits, plus a shield summon&charge on additional input (Hello Skill Cube). The damage is HUGE, the speed is NICE, and input time in-between hits changed from 1,4 seconds to... 5 seconds, yes. You can pat a cat yet again. No i-frame, wow. 🌟You can change the direction of Luna's second dash before placing shields charge, but you have to react quickly, since the animations compared to non-EX version are much faster. ◼️ Skill Cubes: EX Aegis Charge This skill is underestimated on so many levels. At first glance back when i just got promoted, this skill seemed worse than non-EX version for me. No i-frame, no stacks, like, wtf. But then I've become strong, smart, and realized how very wrong I was. Despite losing its stacks and i-frames (which i never used it for anyway, kek), it gains an insane amount of BURST and becomes one of the most used skills in your kit due to its [Defensive Posture]-augmented damage and short cooldown (6,40 seconds with 40% CDR, considering you utilize [Defensive Posture]'s Cooldown Reduction for it wisely) Augmented version makes your explosion a TWO explosions instead, each dealing lesser damage, but way greater damage together. And i must say, missing even 1 of them, considering the hitboxes, is pretty hard. ⭐You can still go for non-EX version, it's up to you and is explained why in the Skill Build section by Vessaliux. ◼️ Skill Cubes: EX Winter Triangle Just when you thought this skill couldn't be any better, you get an EX version of it which makes it a crazy both Damage and Utility tool. It's not that good in terms of utility when you've just learned it. The buffs and debuffs are removed along with floating stars, leaving only a powerful laser attack. however, later, when you get at least an Advanced Skill Cube, you'll change your mind immediately. The three stars are back and they've brought couple new friends with them. Now this skill provides even stronger boost for you and your squad, and even more humiliating debuffs for dem fools who still dare to spawn around. 🌟It has a pretty long start-up channeling animation. Be careful to not use another skill right after you used EX Winter Triangle, wait for the lasers to fire and then continue casting, otherwise you won't get anything except your strongest buff going on at least 18 seconds cooldown. 🌟For the same reason use it wisely and watch out for what Boss does. You wouldn't want to start casting it right before Gremory's bear is about to fist you in the face, or when Yod is starting to cast his Merry-Go-Round bs. ◼️ Skill Cubes: Special Move: Cosmic Strike (FM4) Last, but not least, your final SA skill - the ultimate. It is, of course, an i-frame for the entire cast duration. It deals great damage, has the widest AoE range of all your skills (covers the entire Tiamat arena if cast in the center of it), and the DoT before the big blast does a small hit-stuns to everything that is not in your squad. Gives a shield at Master Cube which gives a super armor enough to facetank, in example, David's Final phase's scythe swings, without any fear to be ping-ponged to death. It also has a very neat animation, check it out someday ;^) 🌟My hobby is to cast it right after FM3 and enjoy the view ◼️ Skill Cubes: 2-5. Awakened Skills Awakened Skills replace normal ones when you get certain piece/set of gear from Purification Ops, a.k.a PG:Deep Orion's Hunt While losing its mob gathering and mobility aspects, gets a nice wide AoE damage + keeps Crit Damage Reduction debuff. [Awakened] Scorpion Combo Summons Aegis and punches it along with the enemies in front. All attacks considered as [Back Attack] and the enemies hit by [Summon Aegis] (first couple hits) will have their Crit Damage Reduction decreased by 20% for 10 seconds Damage taken is reduced by 80% for the entire cast duration. [Awakened] Stage 2 Creates a bigger AoE shockwave when hitting Aegis. Hydra Strike If you land on someone's head with it, it's gonna hurt. [Awakened] Six-headed Ancient Dragon Jumps to the air and strikes the ground, creating 6 rifts around and dealing damage. The Constellation Rift Wave has 40% increased damage on targets with 20% or less HP and always counts as [Critical]. When the skill level is 3 and above, successful [Counter] (both from [Defensive Posture] and [Defensive] stance), the cooldown is reset. Meteor Jump The Swords slightly pull enemies towards your landing spot and deal sweet additional damage before the explosion. [Awakened] Sky Tearing Shield Jumps into the sky and inflicts massive damage upon landing. Activates multiple Harpe Strikes on touchdown. Meteor Jump always counts as [Chase] and triggered Harpe Strikes deal 30% increased damage on targets with 60% or less HP. 2-6. Task Force T. Rebellion Formation: A Does a long channeling animation and releases a powerful hit after. I-frame for the entire cast duration. This skill always counts as Critical and inflicts Air Strike/Back Attack/Chase. T. Rebellion Formation: A - Urgent Deployment Our tsundere buddies join us for a brief second to deliver a massive poke to our enemies. This version offers much faster, almost instant damage deployment and higher damage numbers, but loses its i-frame. This skill always counts as Critical and inflicts Air Strike/Back Attack/Chase. I totally recommend you going for EX version if you have SP for it. In current endgame i-frames are mostly useless, since most of the stuff ignores them, and game requires you to react/burst quickly and move a lot. So non-EX version will most likely get you our your teammates killed while EX will deal more damage in a much shorter time frame, plus you won't be rooted on place for eternity. 2-7. Overview This section has been made just for my ego, since i'm enjoying counting Luna's i-frames way too much. JK, it's actually useful. I-Frames: [Defensive Posture]; [Aegis Charge] -non-EX only; [Harpe Strike]; [FM2: Astraea]; [Meteor Jump]; [Pegasus Kick - Defensive stance]; [Starlight Circle]; [FM3: Universe Strike]; [FM4: Cosmic Strike]. 80% Damage Reduction: [EX Winter Triangle]; [Pegasus Kick]/[Pegasus Comet Kick]; [Orion's Hunt - Scorpion Combo]. Skills which will always result in landing: [Orion's Hunt - Scorpion Combo]; [Hydra Strike]/[Hydra Strike - Six-headed Ancient Dragon]; [Meteor Jump]/[Meteor Jump - Sky Tearing Shield]; [FM2: Ariadne's Crown]; [FM3: Universe Strike]; [Pegasus Kick]/[Pegasus Comet Kick]; [Starlight Circle]. Cutscene Skip (needs more info please send help) : [EX Winter Triangle]; [Hydra Strike - Six-headed Ancient Dragon]; [EX Raven Wing] (was able to skip it with this one but very rarely); [EX Aegis Charge] - rarely (credits to Lereina); [Harpe Strike]; [FM2: Ariadne's Crown]; [Starlight Circle] - thanks to @cruzerblade1029 for this one❤️; [Orion's Hunt] - non-awakened; [FM4: Cosmic Strike]. Back Attack/Chase Proc: [EX Raven Wing] - Back/Chase; [Raven Wing] - Back/Chase on 3rd hit only; [Homing Aegis] - Back/Chase; [Orion's Hunt - Scorpion Combo] - Back; [Orion's Hunt] - Back on post-grab kick and Double dash; [FM1: Astraea] - Back; [FM2: Ariadne's Crown] - Back/Chase; [FM3: Universe Strike] - Back/Chase; [FM4: Cosmic Strike] - Back/Chase - final explosion only; [Meteor Jump]/[Meteor Jump - Sky Tearing Shield] - Chase; [Pegasus Kick] - Chase; [EX Aegis Charge] - Back/Chase on 2nd hit only (Master Cube); [Lion Charge] - Back/Chase on 1st attack, Chase-only after if all hits connect; [EX Wnter Triangle] - Back. Buffs/Debuffs (props to @cruzerblade1029 for suggesting this one): [Buff] [Defensive Posture]/[Pegasus Kick - Defensive stance] - Star guardian (SA Passive)/Shielded [EX Aegis Charge] - Shielded [Buff] [FM1: Astraea]/[FM2: Ariadne's Crown]/[FM3: Universe Strike]/[FM4: Cosmic Strike] [Buff] [Starlight Circle] [Buff/Debuff] [EX Winter Triangle] [Debuff] [Orion's Hunt]/[Orion's Hunt - Scorpion Combo] 2-8. Option Skill Cubes Several people have asked me about these so i've decided to mention it in the guide as well. For Option Skill Cubes i recommend to use Damage%/Damage%+Skill Cost Reduction. I've never seen Epic Damage% Skill Cubes for regular skills, so i stick to either Elite Damage% or Epic Damage%+Skill Cost Reduction. Luna is pretty Mana hungry so these Skill Cubes will help you to not drink pots every 8 sec just to not run at 0 mana 80% of time. I'm not sure if ABC Skill Cubes are better since I can't tell how the damage bonus is calculated. So I'd rather stick to Damage% ones. Thanks to @cruzerblade1029 and @Vessaliux (sorry for the ping pls mercy) I've learned that PPR damage Cubes are good as well, and are even better. If your Skill Cost reduction is capped (40% - again thanks to @cruzerblade1029 regarding the number, i wasn't sure myself), you should go for this one instead of the damage ones, considering how it works and how big the damage bonus difference is. 2-9. Rotations Faceroll. I feel like this part is more of a personal preference, but i'll describe mine and give some advices and explanations. I usually start my rotation from [EX Winter Triangle] (or [EX Raven Wing] to get close to the boss and apply the Satellite Canis' debuff; always prioritize [EX Winter Triangle] and keep it up as often as CDR allows you to) After that i use [Orion's Hunt] to apply Crit Damage Reduction debuff and [Defensive Posture] to augment my skills. After i hit with [EX Aegis Charge] since it's the only skill augmented for a certain time, then [Hydra Strike] and then just load all remaining augmented skills in the boss. I usually use [Harpe Strike] together with [Pegasus Kick], since it's a good way to get back on initial position and keep fighting. If boss is about to land a hit and my [Defensive Posture] is still on cooldown, i use [Pegasus Kick]'s counter instead, if [Defensive Posture] is off cooldown, i use it and then hit with additional augmented [Pegasus Kick]. By that time [Orion's Hunt] is getting off it's CD as well and i use it to re-apply the debuff. Then i just throw in my FMs for buffs and damage. TL;DR [EX Winter Triangle] -> [Orion's Hunt] -> [Defensive Posture] -> [EX Aegis Charge] -> [Hydra Strike] -> [Harpe Strike] -> [EX Raven Wing] -> [Pegasus Kick] -> [Homing Aegis] -> [Defensive Posture] -> etc. ^ This is my main rotation for debuffs and Defense posture utilizing. Sometimes i save FM3 and FM4 for certain mechanics skip (Tiamat/PG75/Irina/David) Later i just use skills as soon as they go off cooldown, prioritizing [EX Winter Triangle] and [EX Aegis Charge] along with [Orion's Hunt]. Important thing to note is, even though i try to use my [Defensive Posture] for SA Passive stacks when possible, i do prioritize using it offensively for augmenting skills and, most important, for keeping [EX Aegis Charge] augmented and on the shortest cooldown possible. I use [Starlight Circle] as a Damage buff, ez PF stack and/or mana sustain, and, obviously, an i-frame for myself and allies; [Meteor Jump] mostly used for i-frames, repositioning and some extra damage in-between my main skills. 3. Skill Build Luna needs all actives maxed. Like, literally, ALL of them. Or maybe not. If you lack SP for passives, read what skills you can avoid maxing with minimal DPS losses. It's under the Skill Build screenshot. [Empowered State: Luna] - Since Luna is pretty easy in terms of stacking PF due to [Defense Posture] and [Constellation's Blessing], she benefits from PF Release a lot. Also her FM4 deals 30% more damage if used is this state. [Cancel: Luna] - Obvious reasons. Emergency escape. Longer i-frame, lower cooldown = even less chances to die. [Combat Dodge] - Maxed at lv.1 [Raven Wing]/[EX Raven Wing] - you can keep non-EX version at lv.10. Up to you whether max it or not. EX version is mandatory, since the damage boost with all the Skill Cubes is really good. [Homing Aegis] - If you read my comment about this gift of the gods, you shouldn't have any questions left by now. Also gets augmented by [Defense Posture]. [Orion's Hunt]/[Orion's Hunt - Scorpion Combo] - Non-awakened version's damage is mediocre, awakened version deals almost twice as much and it actually hurts. Max awakened version. Maxing non-awakened version is not mandatory, it's more for utility purposes rather than damage, you can keep it at lv.10. [Defensive Posture] - If somebody dares to hit you, just hit back. Max for obvious reasons. [FM1: Astraea] - A nice trashmob clearing tool, and since you can use it as a one-hit skill as well, it's good for Bosses too. Also it gives a buff. You can keep it at lv.6 for the Master Cube buff if you feel like spending more SP on passives. [Aegis Charge]/[EX Aegis Charge] - Non-EX version is pretty useful if you can get used to it. EX version is a precious treasure, skipping it is literally a deadly sin. Gets augmented by [Defensive Posture]. A wise man Vessaliux said: As for EX Lion Assault vs non-EX, it is totally viable to go for non-EX. In this case, it would require Tindalos 2/2 for modules instead of Halphas. Non-EX is totally viable, especially after the recent change where the stack system was replaced by a normal cooldown based system. EX indeed has a much larger hitbox and is easier to play with, however in terms of DPS, it only out-damages non-EX with enough tune investments to get it up to Lv15 or so. It is extremely important to mention that EX Lion's initial hit does not proc Back and Chase; only the additional hits from the Master cube does. [Hydra Strike]/[Hydra Strike - Six-headed Ancient Dragon] - Both non-awakened and awakened versions deal sweet damage and get cooldown reset upon successful [Counter]/[Counter - Hit Back], which results in even bigger damage. Max it. [Harpe Strike] - Non-augmented version isn't very convenient for me to use, especially against bosses like WG who love to run around a lot, but augmented one deals full skill damage in a much shorter window, which makes it efficient damaging tool. Also [Defensive Posture] eats away 5 seconds from its cooldown. Max it. [FM2: Ariadne's Crown] - The damage is nice, the i-frame is long, and it gives a buff. You may keep it at lv.6 for the buff only. On 1/3/2019 at 4:57 PM, Vessaliux said: Personally, I feel that you lose so much more DPS by going through with the whole FM2 animation. Luna is already stacked with multiple iframes that it makes FM2's pretty redundant. All of these SPs are better spent on passives. Of course if you have infinite SP due to events, this is irrelevant. [Meteor Jump]/[Meteor Jump - Sky Tearing Shield] - Non-awakened version deals decent damage and obtains useful Skill Cubes which make it stronger. Awakened version gets additional hits and even more damage on top of it. Max it. [Pegasus Kick]/[Pegasus Comet Kick] - Deals good damage and provides and extra [Counter - Hit Back], which can be changed into additional [Pegasus Comet Kick]. Gets augmented by [Defensive Posture]. Max it. [Starlight Circle] - Apart from tasty Master Cube buff, it actually does an OK damage on deployment, making it roughly a 2,5k% difference between lv.10 and lv.20. Plus, if you go Harpas 2/2 set, it gets 34% Damage from it. You might as well keep it at lv.10 for utility and all 3 skill cubes, since the only thing scaling there is damage. [Winter Triangle]/[EX Winter Triangle] - non-EX version is a nice utility tool. EX version is just nuts. Max it, love it and keep it up 100% of time. [FM3: Universe Strike] - One of the strongest nukes in your kit which also provides a very nice buff on cast and allows animation cancel. Why even doubt? [FM4: Cosmic Strike] - Damage, protections shield, i-frame... Why even doubt? (2) 4. Passives My Luna's passives are fully learned because Halloween/Christmas Events were stacked up with SP books, but here are the Core Passives you'd want to have: Reinforce Power - Flat Power is always needed. Critical Blow - Since there's never too much Crit Damage. Air Strike Killer Move - Fits Luna very well because of her Trainee Passive. If you have spare SP left, make sure to invest into such passives as Phase Armor, Barrier, Watch Your Six, Critical Phase Force, Material Penetration and Transcendental Power. 🌟If you lack SP for Critical blow, replace it with Critical Phase Force instead (gods bless Rulebook for reminding me about this one, the man is smart) 4-1. Task Force Passives This is a true definition of Luxury. If you can afford getting at least some of them, don't even doubt. Maxing all 3 offensive passives gave me ~400k TCP boost. Comprehensive Combat Training - Prioritize this one over others since it gives raw power and loads you with that tasty physical crit damage. Phase Force Reinforcement Training - This one for me takes the 2nd place on my list of TF passives to max. It helped me to finally cap my crit rate and released me from my OCD because of having crit rate at ~90% Countermeasure Tactics Training - Shares the 2nd place with Phase Force Reinforcement Training, it's up to you whether you want conditional Damage or conditional Crit rate/Crit Damage first. Comprehensive Defense Training - If you have spare SP left at this point, get some tankiness. It's always nice to not only hit hard, but also to not get hit hard yourself. Improved Luck Buildup - No matter how much Item Bonus% you have, Hell Mod is still a myth. This one is the least important of all TF passives thus can be left behind unless you are suffering from SP overload. 5. Endgame Gear Setup First things first: Luna is ridiculously easy to play. And her kit allows her to solo bosses without any problems. This is why she is a good pick if you prefer playing solo (though you will still need a party for some PGD content) I'm going to say couple words about pre-endgame gear as well, just to make you feel more confident on "what to craft" before the moment you enter PGD As a person who mostly did things solo until later PGD stages, my gear progression looked like this: (my memory is trash so i may be mistaken at some steps please forgive me) Spoiler 1. Boosters: Extreme/Crater/Disaster Core/Receiver: Crater/Disaster Trinkets: 3/3 Extreme + 2 Disaster&SA Card (Doll) 2. With this setup i was able to solo Irina in around 7-10 minutes and got my 3/3 Resistant set: Boosters: Extreme/Crater/Disaster Core/Receiver: Crater/Disaster Trinkets: 3/3 Extreme +3/3 Resistant 3. Getting 3/3 Resistant made me able to solo Judge in 10-13 min: Boosters: Extreme/Crater/Judge Core/Receiver: Judge Trinkets: 3/3 Extreme + 3/3 Resistant 4. After I've finished Extreme/Irina/Judge setup i was able to farm PGD without any issues and started working towards my Endgame set. I started using PGD core at T3 mostly for item level - to be able to enter higher stages without the low ilvl penalty. Later i also got PGD Boosters and Prisoner 3/3 set. I will explain the details below. 5-1. Purification Ops and Wolfgang (pre-endgame) Before BB and Oofman arrived, my setup looked like this: This was the best setup you could get. Unless you're kissed by RNG gods and suddenly get your Hell mod. A little note regarding the trinkets: Hell 3/3 (upper line) replaces 3/3 Purified Prisoner set WG 3/3 (lower line) replaces 3/3 Extreme set Nato Chris Receiver (3) replaces Epsilon Amplifier or David Amplifier if you're lucky enough to get Nato before Epsilon (though i recommend using Epsilon before you Transcend your Nato receiver to at least T4 - it takes a while to stack recources for transcending levels 4&5, especially if it's your first character, and below T4 it isn't really useful.) Important note: Don't replace 3/3 Extreme with 3/3 Prisoner, keep it until you get WG set As you can see, Luna uses 2/2 Harpas mod set. (Why not Tindalos/Yod? Because Tindalos' Lion Charge/Raven chase skill bonus is useless, since it only benefits non-EX versions. Yod is useless because it has Orion's Hunt skill bonus - which is the same as our Weapon Core skill stat). For 3rd mod you can pick both Yod or Tindalos, it makes no difference, just make sure it's a Booster, not Engine. I use craftable Saturn Booster as a budget Hell mod version because I can. Have no faith in RNG anymore, so I've just made smol Hell mod instead. The reason you should aim for Nato's Receiver (3) over (2) is because EX Aegis Charge has better DPS than EX Winter Triangle. Even though EX Winter Triangle has higher damage percentages, the cooldown is too long, while EX Aegis Charge can be used almost thrice as often and has way bigger damage output over time. Also EX Aegis Charge always procs [Back] and [Chase] on the 2nd hit only which makes it even deadlier than it already is. Here's is a rough comparison of both skills at lv.10: (No Back&Chase damage included for both of them, just raw numbers from the skill descriptions) *All cooldowns shown in the table are at 40% CDR stat (capped) IMPORTANT: If you're going for Non-EX Aegis Charge, you should go for 2/2 Tindalos, not Harpas, since Tindalos set empowers normal Aegis Charge version. I repeat it because it's, yes, important. - credits to Vessaliux Also you should use Nato Receiver (2) for EX Winter Triangle, because obviously you don't need a receiver for a skill you don't even have. 5-2. Beelzebub and Hoffman (current endgame) After BB and Hoffman's arrival, as a Luna you'll have to prepare to upgrade and replace most of your gear: Luna DOES need her Puri core to be replaced with Beelzebub core. Why? Even though her awakened Orion's Hunt feels much more convenient, it's still not good enough in terms of damage output to be worth of keeping a Puri Core for it, the only thing you lose is 80% Damage Reduction, which is, again, useless in current endgame, you either i-frame attacks if possible, or combat dodge them if not, else you perish. In my personal opinion, Luna will get much more benefit from switching to BB core since it will boost her overall DPS by a lot, while Orion's Hunt can be kept for utility at lv.10. BB mods also have to replace her 2/2 Harpas Modules and kept along with Saturn Mod/Hell Mod. Despite losing a damage bonus for skills, then again, the bonuses BB mods give will still provide a better overall DPS. If you manage to get Hoffman Mods (Verweile Doch [Booster] and Gott Ist Tot [Engine]) you can replace Puri mods with them as well, since they are better, too, though it's not mandatory to get them, can skip freely. In any case, as soon as you get BB Mods done, replace Puri/Hoffman Mods with it. For triggers i will only speak about BB Raid (12-man version) ones. 3/3 Red Triggers are the ones you have to be aiming for, since the buffs the set gives are too good. Your WG trinkets can now be transcended from T2 up to T4! They change to Hoffman trinkets starting from T3. Good luck with Reborn Stones farming. OR you can replace Wolfgang with that super-rare trinket set which can be dropped in Regular BB Boss dungeons, example (physical): TL;DR Weapon: BB > Puri Modules: BB > Hoffman > Puri Triggers: BB Red (Fly King's Commandment Chapters 1-3) Trinkets: Hoffman T4 - transcended T2 WG [OR] 3/3 Advancing King of Gluttony - Force (don't replace Hell 3/3 with anything!) 6. PNA, Chips and Tunes 6-1. PNA Let's start with PNA, since those are pretty obvious and straightforward: This is my current PNA Setup. Nothing special. There is, however, a couple things to mention: [Offensive Strain]: Total Physical Power: do combine 'flat' and 'rate' physical power genes for the highest values possible until ~20k Attack. Physical/Psi Defense Penetration: can be replaced with Crit Rate if you feel like it. Replace it with Pen when you have Crit Rate capped. Air Strike Crit Damage: since all 3 conditional PNAs give the same % amount, go for air for the 100% proc. [Utility Strain]: Damage Bonus during Empowered State: replaces Skill Cooldown Reduction when you overcap it. I recommend using Skill CDR at the beginning. [Special Strain] PNAs are: Weapon Affinity, Aerialist and Backstabber. Amplified PNA With the addition of Bear Land, we now have another thing to load credits into. Let's see what we have here. This is my setup so far: Red Genes: [Damage Increase on Transcendent] - not really worth upgrading imo, the numbers are too small in comparison with the fee it takes. Blue Genes: [Physical/Psi Damage Reduction] - probably worth upgrading, but don't prioritize it over green ones. Green Genes: [Skill Cost Reduction & Cooldown] - this is useful. A lv.10 gene will give you 10% CDR and Cost reduction. And you can use plenty of them. Upgrading Green Genes is important since you can replace your Utility Strain's CDR PNA with PPR Damage ones and it will boost your damage. I use Back Attack Crit Damage for Hidden Sequence. You can see the pattern required to get it on the screenshot - the required PNA colors and places they have to be set in are in light purple frames. 6-2. Chips This is how my chip setup looks like. I prioritize Back Attack over Air Strike since it scales much better and most of Luna's skills have Back Attack built in them. Modules: [Latest Purple Chip]/[Platinum Chip: Back Attack] Core: [Dual Chip: Red&Yellow]x2/[Platinum Chip: Red] Trinkets: [Platinum Chip: Back Attack] 6-3. Tunes This will include both Gear and Costume tunes. Brace yourselves. ⭐Stats are placed from most important to least important. 🌟The more attack speed Luna has, the shorter her i-frame animations are (Example: successful [Counter], [Meteor Jump]'s landing, etc.) Gear: Modules: Physical Crit Damage Bonus; EX Skill lvl +1 (Winter Triangle or Aegis Charge); Air/Back/Chase Damage; Air/Back/Chase Crit Damage; Damage Bonus during Empowered State. Core: Physical Crit Damage Bonus; Additional Physical Power; Air/Back/Chase Crit Damage; Air/Back/Chase Damage; Damage Bonus During Empowered State; Attack Speed. Receiver: Physical Crit Damage Bonus; Faction Damage bonus; Physical Crit Rate; Defensive Passive Skill lvl +1 (Phase Armor or Barrier). Trinkets: Total Physical Power; Physical Crit Damage Bonus; Air/Back/Chase Damage; Physical Defense Penetration; Total Physical/Psi Defense. Important Note: Make sure to get Master Cubes on ALL of your EX Skills. This means a lot. EX Skills can only be rolled on Modules. FM4, EX Raven Wing and EX Aegis Charge are up to you to decide if to roll them or not, since Master Cubes for these can be obtained via leveling. Honestly i see no point at leveling EX Raven Wing beyond lv.10. Not by spending a Tune on it. Same for FM4, i'd rather roll an offensive stat on my weapon instead of giving a tuning slot to a single skill. EX Aegis Charge still worth a tuning slot since it's your main DPS source. Costumes: I'm going to cover Offensive stats only. If costume piece isn't included, means it has no offensive tunes in the pool. Weapon/Gloves: Total Physical Power; Physical Crit Damage Bonus. Hair/Hat: Damage Bonus during Empowered State; Attack Speed. Feet (Shoes)/Arms/Waist: Air/Back/Chase Damage; Air/Back/Chase Crit Damage. Effect (Phase Wings/Aura): Total Physical Damage; Physical Critical Damage; Air/Back/Chase Crit Damage; Air/Back/Chase Damage. 7. Credits&Thanks Big thanks to all my Luminiera crewmates for helping me to become stronger and smarter, i wouldn't have even started writing this guide without their help and support 💕 🌙 @Rulebook, @Vessaliux and @cruzerblade1029 for making this guide better with their feedback and useful info, ily ❤️ 🌙 Skill Cubes' descriptions, along with Skill Pictures, are mostly taken from Closers HQ Wiki: [ http://wiki.closershq.com ] 🌙 Skill Tunes made with the help of [FO] Nata's Guide: [ https://codeclosers.to/forums/index.php?/topic/4008-tunings-list/ ] 🌙 Luna selfie's style inspired by Luminiera's forum intro ;^) 🌙 Thank YOU for taking time and reading this guide! 8. Changelog&To-do list Recording my lazy progress here. [06/12/19] Added Amplified PNA info. Added Task Force info. [06/19/19] Added my current unfinished PNA setup. Will update again later. Added BB and Hoffman gear info. [07/22/19] Skill names AND Skill Cube names (buffs, etc.) changed to match new translations. This also goes for Skill Build section. New Cute TF Luna is also there watching you while you read the guide, eksdee. Things to do: - Add new gear info (Hoffman and BB raid); Add pictures when the gear is done. - Update basic PNA setup to match my current one. Now upgrade them all to lv.10 so it makes me look like a whale and update again. - Change all skill names to match new translations. i'm dead. Edited September 6, 2019 by Esther Skill Build and Explanations added; Passives added; Endgame Gear Info added; PNA Info added; Chips and Tunes added; More passives info added; Rotations added; Respects paid. F